


使用macOS的自动操作实现右键执行特定shell脚本
在 macOS 中,可以通过创建 Finder 服务(Service) 将 Python 脚本添加到右键菜单。以下是详细步骤:
一、创建脚本
方法 1:使用 Automator 创建服务(推荐)
步骤:
- 打开 Automator
Spotlight 搜索Automator并打开。


- 新建「快速操作」
- 选择
快速操作>选取 - 顶部设置如下:
- 工作流程收到当前:
文件夹 - 位于:
访达(Finder) - ✅
用输出内容替换所选文本(取消勾选)
- 工作流程收到当前:
- 选择

-
添加「运行 Shell 脚本」操作
- 左侧搜索栏输入
shell,拖拽 「运行 Shell 脚本」 到右侧工作区。 - 配置:
- Shell:
/bin/zsh(或/bin/bash) - 传递输入:
作为自变量
- Shell:
- 在脚本框中输入以下内容(替换为你的实际路径):
for folder in "$@" do # 获取Python3路径 python_path=$(which python3) # 脚本路径(确保这是正确的) script_path="/Users/yyy/lab/other/zip-pack/gitignore_zip.py" # 正确调用方式:解释器路径、脚本路径、参数 分开传递 "$python_path" "$script_path" -s "$folder" done- 将
script_path替换为你的 Python 脚本绝对路径(如/Users/username/Scripts/compress.py)。
- 将
- 左侧搜索栏输入
-
保存服务
- 顶部菜单:
文件>保存,命名为压缩文件夹。
- 顶部菜单:
方法 2:手动创建 .workflow 文件(高级)
如果 Automator 操作失败,可直接创建 plist 文件:
# 创建服务目录
mkdir -p ~/Library/Services

# 创建 .workflow 文件
cat > ~/Library/Services/CompressFolder.workflow/Contents/document.wflow <<EOF
<?xml version="1.0" encoding="UTF-8"?>
<!DOCTYPE plist PUBLIC "-//Apple//DTD PLIST 1.0//EN" "http://www.apple.com/DTDs/PropertyList-1.0.dtd">
<plist version="1.0">
<dict>
    <key>AMApplicationBuild</key>
    <string>Automator 2.11</string>
    <key>AMDocumentVersion</key>
    <string>2</string>
    <key>actions</key>
    <array>
        <dict>
            <key>Action</key>
            <dict>
                <key>ActionBundlePath</key>
                <string>/System/Library/Automator/Run Shell Script.action</string>
                <key>ActionClass</key>
                <string>AMRunShellScriptAction</string>
                <key>ActionKeywords</key>
                <array>
                    <string>Shell</string>
                    <string>Script</string>
                    <string>Command</string>
                    <string>Run</string>
                </array>
                <key>ActionName</key>
                <string>运行 Shell 脚本</string>
                <key>Parameters</key>
                <dict>
                    <key>COMMAND_STRING</key>
                    <string>for f in "\$@"; do /usr/bin/python3 /path/to/your_script.py "\$f"; done</string>
                    <key>inputMethod</key>
                    <integer>1</integer>
                    <key>shell</key>
                    <string>/bin/zsh</string>
                </dict>
            </dict>
        </dict>
    </array>
    <key>creationDate</key>
    <date>$(date -u +"%Y-%m-%dT%H:%M:%SZ")</date>
    <key>description</key>
    <string>压缩选中的文件夹</string>
    <key>inputType</key>
    <string>com.apple.finder.folder</string>
</dict>
</plist>
EOF
- 替换
/path/to/your_script.py为你的脚本路径。
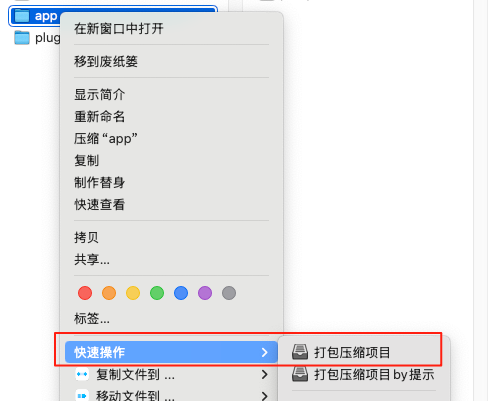
使用右键菜单
- 在 Finder 中选中文件夹 > 右键 > 服务 > 选择
压缩文件夹。
- 首次运行时:系统可能会提示权限问题,需前往:
系统设置>隐私与安全性>辅助功能> 允许 Automator 权限。
调试技巧
-
检查 Python 路径:
终端执行which python3确认解释器路径(通常是/usr/bin/python3)。 -
脚本权限:
chmod +x /path/to/your_script.py # 添加可执行权限 -
日志输出:
在 Shell 脚本中添加日志记录:for folder in "$@" do echo "处理: $folder" >> ~/compress.log /usr/bin/python3 /path/to/script.py "$folder" 2>&1 >> ~/compress.log done
完整 Python 脚本示例(参考)
作用: 对指定目录进行zip打包,并且根据目录下的 .gitignore 忽略内部的文件。
#!/usr/bin/env python3
# -*- coding: utf-8 -*-

"""
gitignore_zip.py - 根据.gitignore规则对目录进行zip打包的工具

使用方法:
    python gitignore_zip.py -s <源目录> [-o <输出zip文件>] [-v]

参数:
    -s, --source: 要打包的源目录路径
    -o, --output: 可选,输出的zip文件路径。如果不指定,将使用源目录名称.zip
    -v, --verbose: 显示详细信息
"""

import os
import sys
import zipfile
import argparse
import pathspec
from pathlib import Path


def read_gitignore(directory):
    """读取.gitignore文件并返回pathspec对象"""
    gitignore_path = os.path.join(directory, '.gitignore')

    if not os.path.exists(gitignore_path):
        return None

    with open(gitignore_path, 'r', encoding='utf-8') as f:
        gitignore_content = f.read()

    return pathspec.PathSpec.from_lines('gitwildmatch', gitignore_content.splitlines())


def should_ignore(path, base_dir, spec):
    """判断文件是否应该被忽略"""
    # 始终忽略.git目录
    if '.git' in path.split(os.path.sep):
        return True

    if spec is None:
        return False

    # 将路径转换为相对于base_dir的路径
    rel_path = os.path.relpath(path, base_dir)

    # 在Windows上将路径分隔符转换为正斜杠
    rel_path = rel_path.replace(os.path.sep, '/')

    return spec.match_file(rel_path)


def zip_directory(source_dir, output_zip, verbose=False):
    """根据.gitignore规则打包目录"""
    source_dir = os.path.abspath(source_dir)

    # 始终输出基本信息
    print(f"源目录: {source_dir}")
    print(f"输出文件: {output_zip}")

    if not os.path.exists(source_dir):
        print(f"错误: 源目录 '{source_dir}' 不存在")
        return False

    if not os.path.isdir(source_dir):
        print(f"错误: '{source_dir}' 不是一个目录")
        return False

    # 如果输出文件已存在,则删除它
    if os.path.exists(output_zip):
        print(f"发现已存在的输出文件,正在删除: {output_zip}")
        os.remove(output_zip)

    # 读取.gitignore规则
    gitignore_spec = read_gitignore(source_dir)
    if gitignore_spec is None:
        print(f"警告: 在 '{source_dir}' 中没有找到.gitignore文件,将只忽略.git目录")

    # 创建zip文件
    try:
        with zipfile.ZipFile(output_zip, 'w', zipfile.ZIP_DEFLATED) as zipf:
            file_count = 0
            ignored_count = 0

            for root, dirs, files in os.walk(source_dir):
                # 过滤掉应该被忽略的目录
                dirs[:] = [d for d in dirs if not should_ignore(os.path.join(root, d), source_dir, gitignore_spec)]

                for file in files:
                    file_path = os.path.join(root, file)

                    # 跳过.gitignore文件本身
                    if file == '.gitignore':
                        if verbose:
                            print(f"跳过: {file_path}")
                        ignored_count += 1
                        continue

                    # 检查文件是否应该被忽略
                    if should_ignore(file_path, source_dir, gitignore_spec):
                        if verbose:
                            print(f"忽略: {file_path}")
                        ignored_count += 1
                        continue

                    # 将文件添加到zip中
                    rel_path = os.path.relpath(file_path, source_dir)
                    if verbose:
                        print(f"添加: {rel_path}")
                    zipf.write(file_path, rel_path)
                    file_count += 1

            # 总是显示总结信息
            print(f"\n总结:")
            print(f"- 添加文件数: {file_count}")
            print(f"- 忽略文件数: {ignored_count}")
            print(f"- 打包完成: {output_zip}")

        return True
    except Exception as e:
        print(f"打包过程中出错: {str(e)}")
        return False


def main():
    """主函数"""
    parser = argparse.ArgumentParser(description='根据.gitignore规则对目录进行zip打包')
    parser.add_argument('-s', '--source', required=True, help='要打包的源目录路径')
    parser.add_argument('-o', '--output', required=False, help='输出的zip文件路径(可选)')
    parser.add_argument('-v', '--verbose', action='store_true', help='显示详细信息')

    args = parser.parse_args()

    # 设置输出文件在源目录的父目录下
    source_dir = os.path.abspath(args.source)
    parent_dir = os.path.dirname(source_dir)
    dir_name = os.path.basename(source_dir)

    if not args.output:
        args.output = os.path.join(parent_dir, f"{dir_name}.zip")
        print(f"输出文件将保存在: {args.output}")

    # 确保输出目录存在
    output_dir = os.path.dirname(os.path.abspath(args.output))
    if output_dir and not os.path.exists(output_dir):
        os.makedirs(output_dir)

    # 执行打包
    success = zip_directory(args.source, args.output, args.verbose)

    return 0 if success else 1


if __name__ == '__main__':
    sys.exit(main())
通过以上步骤,你的压缩脚本将集成到 Finder 右键菜单中,实现一键操作!
二、查询已创建的 快速操作
在 macOS 中查看已创建的快速操作(Quick Actions)(即通过 Automator 创建的右键菜单服务),可通过以下三种方式实现:
🗂️ 1. 通过 Finder 直接查看文件位置
所有用户创建的快速操作均保存在系统特定目录中:
- 路径:
~/Library/Services/
(~代表当前用户主目录,如/Users/你的用户名/Library/Services/) - 操作步骤:
- 打开 Finder → 顶部菜单选择 前往 → 前往文件夹;
- 输入
~/Library/Services并回车; - 此处会列出所有已创建的
.workflow文件(即快速操作脚本)。
⚙️ 2. 通过系统设置查看与管理
在系统设置中可查看所有服务的开关状态:
- 操作路径:
- 打开 系统设置 → 键盘 → 快捷键 → 服务;
- 在右侧列表的 “通用” 和 “文件和文件夹” 分类下,可看到所有已安装的服务(包括系统默认和用户创建);
- ✅ 勾选表示启用,❌ 取消勾选表示禁用。
- 界面示例:

⌨️ 3. 通过终端命令快速列表
使用终端命令可一键输出所有自定义快速操作名称:
ls -1 ~/Library/Services/*.workflow | awk -F/ '{print $NF}' | sed 's/.workflow//'
- 说明:
ls -1:列出~/Library/Services/下所有.workflow文件;awk和sed:提取文件名(去除路径和后缀)。
⚠️ 注意事项
- 系统级服务:部分服务由系统或第三方应用提供,不在
~/Library/Services/中(如文本处理类服务位于/System/Library/Services/)。 - 启用/禁用:在 系统设置 > 键盘 > 快捷键 > 服务 中勾选服务名以启用,取消勾选则禁用。
- 删除操作:直接在
~/Library/Services/删除对应的.workflow文件即可移除。
💎 总结
| 查询方式 | 适用场景 | 操作难度 |
|---|---|---|
| Finder 文件查看 | 直接管理文件(删除/备份) | ⭐⭐ |
| 系统设置 | 启用/禁用服务 | ⭐ |
| 终端命令 | 快速获取名称列表(适合批量操作) | ⭐⭐ |
建议优先使用 系统设置 路径查看服务状态,需进一步管理文件时再访问 ~/Library/Services/ 目录。

阅读建议
评论
匿名评论
隐私政策
你无需删除空行,直接评论以获取最佳展示效果